
Best iPhone camera setting — have you ever wondered why some iPhone photos look absolutely breathtaking while yours seem ordinary? The secret isn’t always about owning the latest iPhone model; it’s about understanding and using the best iPhone camera setting that professional photographers rely on every single day. iPhone photography has completely transformed the way we capture life’s precious moments, from family gatherings to once-in-a-lifetime travel experiences.
The truth is, your iPhone is already powerful enough to produce gallery-worthy images that can rival expensive DSLR cameras—if you know how to unlock its hidden potential. The real difference between amateur snapshots and stunning photographs often comes down to just a few simple adjustments in the best iPhone camera setting.
This comprehensive guide will walk you through every essential best iPhone camera setting you need to master, helping you transform your photography skills from basic to brilliant. Whether you’re capturing golden-hour landscapes, timeless family portraits, or scroll-stopping content for social media, these proven best iPhone camera settings will elevate your photo quality to the next level and help you create images that truly resonate with emotion, detail, and clarity.
What Are the Best iPhone Camera Settings?
When we talk about the best iPhone camera settings, we’re referring to the optimal configuration of your iPhone’s camera app that maximizes image quality, clarity, and creative control. Understanding these settings means knowing how to adjust exposure, focus, HDR, resolution, and various shooting modes to match your photography goals. Many iPhone users simply open the camera app and start shooting with default settings, missing out on incredible features built right into their device.
The difference between default and optimized camera settings is like the difference between cooking with a recipe versus just throwing ingredients together—both might work, but one produces consistently better results. Default settings are designed for average conditions and quick snapshots, but they don’t account for specific lighting challenges, artistic vision, or professional requirements. Optimized iPhone camera settings give you control over depth of field, exposure compensation, color balance, and image processing.
Every user should manually adjust their best iPhone camera setting because photography is personal and situational. What works for bright outdoor photography won’t work for intimate indoor portraits. What’s perfect for Instagram stories might not be ideal for printing large photos. By taking just a few minutes to understand and customize these settings, you’ll notice an immediate improvement in sharpness, color accuracy, dynamic range, and overall photo appeal—transforming everyday moments into extraordinary memories.
Best iPhone Camera Settings for Daily Photography
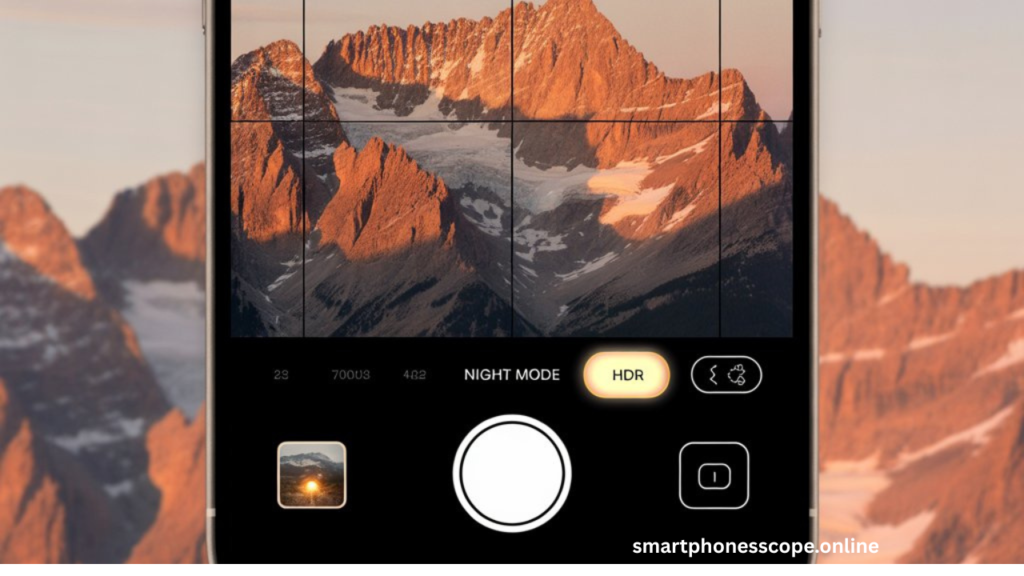
Enable Grid – Best iPhone Camera Setting for Composition
The grid setting is arguably the most underrated yet powerful best iPhone camera setting for beginners and professionals alike. This simple overlay divides your screen into nine equal sections using two horizontal and two vertical lines, creating what photographers call the “rule of thirds.” This centuries-old compositional technique suggests that placing your subject along these lines or at their intersections creates more balanced, engaging, and visually appealing photographs than centering everything.
To enable the grid on your iPhone, navigate to Settings > Camera > Grid and toggle it on. Once activated, you’ll see these guiding lines every time you open your camera app—they won’t appear in your final photos, only in your viewfinder. The grid helps you align horizons in landscape photography, position faces in portrait shots, and create symmetrical architectural images with perfect balance.
This is the perfect best iPhone camera setting for beginners because it provides instant visual feedback on composition without requiring technical knowledge. The grid trains your eye to see balance and proportion, gradually improving your natural compositional instincts. Professional photographers still use this feature because even with years of experience, having that visual reference ensures consistency and prevents tilted horizons or awkwardly centered subjects that can ruin otherwise perfect shots.
Smart HDR – Best iPhone Camera Setting for Balanced Photos
Smart HDR (High Dynamic Range) is one of the most transformative best iPhone camera settings available on modern iPhones. This intelligent feature captures multiple exposures of the same scene in a fraction of a second and combines them to create a single image with balanced highlights, shadows, and midtones. Without Smart HDR, you might face the common dilemma of choosing between a properly exposed sky or properly exposed foreground—with it, you get both.
Smart HDR works by analyzing the scene and automatically adjusting how it processes light and dark areas. When photographing a person against a bright window, Smart HDR ensures their face is well-lit while preventing the background from becoming a blown-out white mess. When capturing a sunset, it preserves the vibrant colors in the sky while keeping foreground details visible and rich.
To access this setting, go to Settings > Camera and ensure Smart HDR or Auto HDR is enabled (the exact name varies by iPhone model). For most situations, keeping this best iPhone camera setting turned ON is ideal. However, you might want to turn it OFF when shooting high-contrast artistic photos where you deliberately want deep shadows or bright highlights, or when photographing fast-moving subjects where the multi-exposure processing might cause slight motion blur. This is a must-have best iPhone camera setting because it dramatically expands your camera’s ability to handle challenging lighting conditions that would normally result in unusable photos.
Camera Resolution & Format Settings
Understanding resolution and format settings is crucial for anyone seeking the best iPhone camera setting for their specific needs. Your iPhone offers different ways to store photos, each with distinct advantages depending on whether you prioritize storage space, editing flexibility, or universal compatibility.
High Efficiency vs Most Compatible:
| Format | File Type | Advantages | Best For |
|---|---|---|---|
| High Efficiency | HEIF/HEVC | Smaller file sizes, same quality, saves storage space | Most everyday users, social media sharing |
| Most Compatible | JPEG/H.264 | Works with all devices and software, easier sharing | Users with older devices, maximum compatibility needs |
To adjust this, go to Settings > Camera > Formats and choose your preference. High Efficiency is the default and recommended best iPhone camera setting for most users because it reduces file sizes by up to 50% without visible quality loss—meaning more photos fit on your device without compromising clarity.
ProRAW & ProRes (iPhone 12 Pro and later):
For professional users and serious photography enthusiasts, ProRAW and ProRes represent the ultimate best iPhone camera setting options. ProRAW captures uncompressed image data with all sensor information intact, giving you maximum flexibility in post-processing apps like Lightroom or Photoshop. ProRes does the same for video. These formats create much larger files but preserve every detail, allowing for extensive color grading, exposure adjustment, and professional-level editing that compressed formats simply cannot match. Enable these in Settings > Camera > Formats > Apple ProRAW for photos or ProRes Encoding for videos.
Best iPhone Camera Settings for Portrait Photography
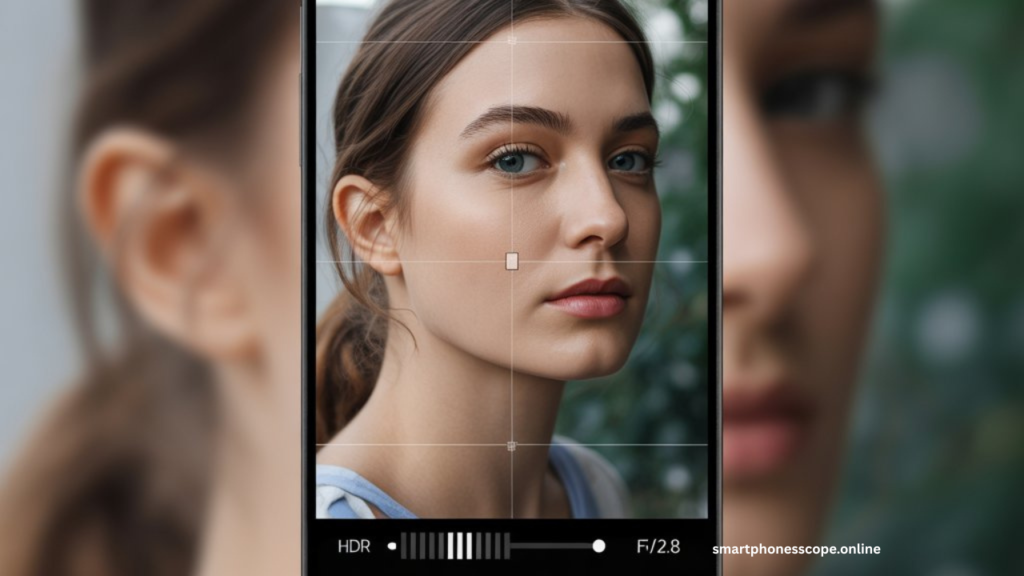
Portrait Mode Depth Control
Portrait photography on iPhone has become incredibly sophisticated, and understanding depth control is essential for the best iPhone camera setting results in this mode. The depth effect creates that beautiful background blur (bokeh) that makes your subject stand out dramatically, mimicking the look of professional cameras with expensive lenses.
When you open Portrait mode, you’ll notice an f-stop indicator (usually showing f/4.5 or similar). This represents the simulated aperture and controls how blurred the background appears. To adjust depth while shooting or after taking the photo, tap the f-stop icon and slide left or right. Lower numbers (f/1.4-f/2.8) create more dramatic blur with your subject sharply in focus, while higher numbers (f/8-f/16) keep more of the scene sharp.
The best iPhone camera setting for natural background blur typically falls between f/2.8 and f/4.5, which creates pleasant separation without looking artificially processed. Too much blur (f/1.4) can sometimes look unrealistic or cause edge detection errors around hair and faces. Practice adjusting this depth control in different lighting conditions to find what looks most natural and emotionally compelling for your portrait style.
Lighting Effects
iPhone’s Portrait mode includes sophisticated lighting effects that transform the best iPhone camera setting options for portrait photography into a portable studio. These computational photography features simulate professional studio lighting setups that would normally require expensive equipment and expertise.
The available lighting modes include:
- Natural Light: No additional effects, just the depth blur—perfect for outdoor portraits and natural-looking results
- Studio Light: Brightens facial features while maintaining natural shadows, ideal for general portrait photography
- Contour Light: Adds dramatic shadows for a more sculpted, editorial look—excellent for artistic portraits
- Stage Light: Isolates the subject against a black background, creating dramatic theatrical portraits
- Stage Light Mono: Same as Stage Light but in black and white for classic, timeless portraits
- High-Key Light Mono: Creates bright, clean monochrome portraits with minimal shadows—perfect for professional headshots
To use these effects, swipe through the lighting options while in Portrait mode, or edit them after taking the photo by tapping “Edit.” The best iPhone camera setting tips for portrait shots include experimenting with different lighting effects on the same subject to see which most effectively conveys the mood and emotion you’re trying to capture. Studio Light works beautifully for everyday portraits, while Contour Light adds drama and sophistication for more artistic expressions.
Best iPhone Camera Settings for Low Light & Night Photos
Night Mode Settings
Night Mode represents one of the most impressive advancements in iPhone photography and is an essential best iPhone camera setting for low-light situations. This feature automatically activates when your iPhone detects insufficient lighting, indicated by a yellow Night Mode icon appearing in the camera interface. When enabled, your iPhone captures multiple frames over several seconds and intelligently combines them to produce bright, clear, and remarkably noise-free photos in conditions that would normally result in dark, grainy images.
The magic of Night Mode lies in its flexibility. You’ll notice a number (like 3s or 10s) that indicates how long the exposure will last. For static scenes like architecture or landscapes, you can increase this exposure time by sliding the dial to maximum, which might be 10-30 seconds depending on lighting conditions. This longer exposure captures more light and detail, producing stunning nighttime images with clarity that seems impossible.
However, the best iPhone camera setting approach for Night Mode varies by situation. For moving subjects like people or pets, keep the exposure shorter (1-3 seconds) to minimize motion blur, even if the image isn’t as bright. For stationary subjects, maximize the exposure time and use a stable surface or tripod for crystal-clear night photos. The key to mastering this best iPhone camera setting is understanding that longer isn’t always better—balance exposure time with your subject’s movement and your ability to hold the phone steady for breathtaking low-light photography.
Exposure & Focus Lock
AE/AF Lock (Auto Exposure/Auto Focus Lock) is a professional-level best iPhone camera setting technique that gives you precise control in challenging lighting situations, especially critical for low-light photography where your iPhone might struggle to determine the correct exposure and focus point.
To use this powerful feature, tap and hold on your subject until you see “AE/AF LOCK” appear on screen. This freezes both the exposure level and focus point, preventing your camera from readjusting as you recompose your shot or as lighting conditions change slightly. This is invaluable when photographing concerts, candlelit dinners, or nighttime cityscapes where bright lights and dark areas might confuse the camera’s automatic systems.
The best iPhone camera setting practice for low-light photography involves using AE/AF Lock strategically. Lock your exposure on a midtone area (not the brightest or darkest part), then recompose your shot. This ensures consistent exposure across multiple shots and prevents the frustrating experience of your camera suddenly brightening or darkening the scene unexpectedly. You can also adjust exposure after locking by sliding up or down on the screen, giving you fine-tuned control over brightness while maintaining focus—a combination that produces professional-quality low-light photographs with intentional creative control.
Best iPhone Camera Settings for Landscape & Nature Photos
Landscape and nature photography demand specific technical approaches to capture the grandeur and beauty of the natural world. The best iPhone camera setting combination for these scenarios focuses on maximizing detail, color accuracy, and dynamic range across expansive scenes.
First, always use your iPhone’s wide lens rather than zooming digitally. Digital zoom degrades image quality significantly, while the wide lens captures maximum detail and maintains sharpness across the entire frame. The wide-angle perspective also enhances the sense of depth and scale that makes landscape photography so impactful—making mountains feel more majestic and valleys more expansive.
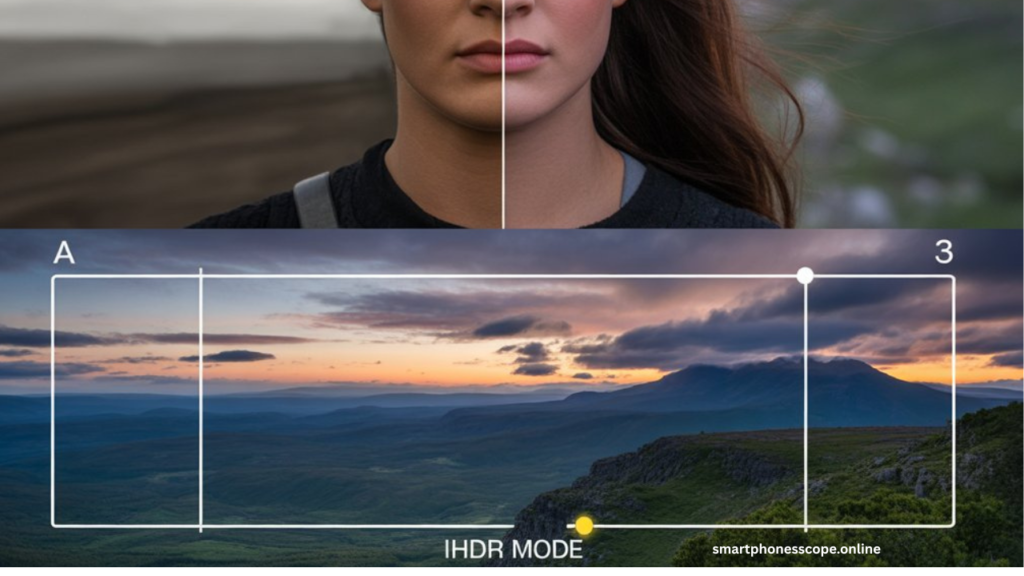
Second, ensure Smart HDR is enabled for landscape shots. Nature scenes typically include bright skies and darker foreground elements, exactly the challenging dynamic range that HDR excels at balancing. This best iPhone camera setting prevents washed-out skies while keeping foreground details rich and visible, capturing the scene as your eyes actually see it rather than forcing you to choose between properly exposed sky or land.
Third, master exposure balance by tapping on different areas of your composition and observing how the overall brightness changes. For sunset landscapes, try locking exposure on the sky (slightly underexposing the foreground) to preserve those vibrant oranges and pinks—you can always brighten shadows in editing, but blown-out highlights are unrecoverable. The best iPhone camera setting combo for nature photography combines wide lens + HDR + manual exposure adjustment + grid composition, resulting in stunning landscape images that capture the emotional impact and breathtaking beauty of the natural world in ways that truly do justice to what you witnessed.
Best iPhone Camera Settings for Social Media (Instagram, TikTok)
Creating content for social media requires understanding platform-specific requirements, and the best iPhone camera setting approach differs from traditional photography because you’re optimizing for small screens, quick viewing, and specific aspect ratios that maximize engagement.
Aspect Ratio Selection:
| Platform | Recommended Ratio | Best iPhone Setting |
|---|---|---|
| Instagram Feed | 4:3 or 1:1 (Square) | Shoot in 4:3, crop to square in editing |
| Instagram Stories/Reels | 9:16 (Vertical) | Shoot video in vertical orientation |
| TikTok | 9:16 (Vertical) | Shoot video in vertical orientation |
| 4:3 or 16:9 | Default 4:3 works well | |
| YouTube | 16:9 (Horizontal) | Shoot in landscape orientation |
To optimize your best iPhone camera setting for social media, go to Settings > Camera > Record Video and select 1080p at 30fps for most content (60fps for smooth motion in action content). While 4K offers higher quality, the file sizes are enormous and most social platforms compress videos anyway, making 1080p the sweet spot for quality and practicality.
Live Photos deserve special consideration. For social media content creators, turning Live Photos OFF is often the best iPhone camera setting because it prevents accidental movement in your images and reduces file sizes. However, keep them ON if you plan to extract video clips or create animated content from still moments—Instagram Reels and TikToks can incorporate Live Photo moments for dynamic storytelling.
The ultimate best iPhone camera setting for content creators includes: 1080p video at 30-60fps, Live Photos OFF for stills but ON for potential video content, grid enabled for composition, and shooting in the native aspect ratio of your primary platform. This approach ensures your content looks polished, loads quickly, and maximizes visual impact where your audience actually sees it.
Advanced Best iPhone Camera Settings (Pro Users)
For photographers ready to take complete creative control, understanding advanced settings transforms your iPhone into a professional-grade camera with best iPhone camera setting options that rival dedicated camera equipment.
Manual Exposure Control: While iPhone doesn’t have full manual mode in the native app, you can adjust exposure by tapping on your subject and sliding the sun icon up or down. This adjusts the exposure compensation, allowing you to intentionally overexpose (brighten) or underexpose (darken) your images for creative effect. Professional photographers use this best iPhone camera setting technique to create high-key bright images, moody low-key portraits, or to preserve highlight detail in challenging lighting.
White Balance Adjustments: Although the native iPhone camera app automatically adjusts white balance, this can be limiting for professional work. Colors might appear too warm (orange) in tungsten lighting or too cool (blue) in shade. For precise control, use third-party apps like Halide or ProCamera that offer manual white balance adjustment, allowing you to set exact color temperature (measured in Kelvin) for consistent, accurate colors across multiple shots—essential for product photography, real estate, or any professional application.
Third-Party Apps: The best iPhone camera setting flexibility comes from professional camera apps that unlock capabilities not available in the native camera app:
- Halide: Offers manual focus, shutter speed control, RAW shooting, and professional-grade interface
- ProCamera: Provides full manual control, including ISO and shutter speed independently
- Moment Pro Camera: Designed by photographers for photographers with intuitive manual controls
- Adobe Lightroom Camera: Shoots RAW with integrated editing workflow
For truly professional photography, the best iPhone camera setting approach involves shooting in ProRAW mode (if your iPhone supports it) combined with third-party apps that offer manual control over focus, shutter speed (1/8000s to 30s), ISO (sensitivity to light), and white balance. This level of control allows you to shoot long exposures for light trails, freeze fast action with high shutter speeds, and maintain creative consistency across entire photo shoots—transforming your iPhone from a convenient snapshot device into a legitimate professional tool.
Common Mistakes While Using iPhone Camera Settings
Even with the best iPhone camera setting knowledge, many photographers make avoidable mistakes that compromise their image quality. Understanding these common errors will help you produce consistently better photos.
Overusing Zoom: This is perhaps the most damaging mistake iPhone users make. Digital zoom on iPhone simply crops and enlarges the image, dramatically reducing quality and introducing pixelation. Unlike optical zoom on professional cameras, your iPhone’s digital zoom (except on Pro models with multiple lenses) degrades image sharpness significantly. The best iPhone camera setting practice is to physically move closer to your subject whenever possible, or simply take the photo wider and crop in post-processing, which gives you more control and often better results than in-camera digital zoom.
Misusing Filters: While Instagram-style filters can enhance photos, applying them before taking the picture is a critical error. Filters permanently alter your image in ways you cannot undo, limiting editing flexibility later. The best iPhone camera setting approach is to always shoot photos in their natural state, then apply filters during editing when you can compare options, adjust intensity, and change your mind without losing the original. This preserves maximum image quality and creative flexibility.
Ignoring Best iPhone Camera Settings: Perhaps the biggest mistake is simply using default settings for every situation. Your iPhone offers remarkable capability, but only if you engage with its features. Shooting in poorly lit restaurants without Night Mode, taking portraits without depth adjustment, or capturing landscapes without HDR means you’re not utilizing the powerful tools at your disposal. The most successful iPhone photographers understand that the best iPhone camera setting changes based on context—what works for bright beach photos won’t work for indoor concerts, and treating all photography scenarios the same inevitably leads to disappointing results.
Additional mistakes include not cleaning your lens (even slight fingerprints dramatically reduce sharpness), shooting important photos without checking focus and exposure, and not using the volume button or timer to reduce camera shake. By avoiding these common errors and thoughtfully applying the best iPhone camera setting for each unique situation, you’ll notice immediate improvement in your photography success rate and overall image quality.
FAQs – Best iPhone Camera Settings
What is the best iPhone camera setting for sharp photos?
Enable grid, tap to focus, use volume button as shutter, and ensure good lighting.
What is the best iPhone camera setting for night photography?
Enable Night Mode with maximum exposure time and stabilize your iPhone.
What is the best iPhone camera setting for portrait mode?
Use depth between f/2.8-f/4.5 with Studio or Contour lighting.
What is the best iPhone camera setting for beginners?
Enable grid, turn on Smart HDR, and use rule of thirds composition.
Should I use High Efficiency or Most Compatible format?
Use High Efficiency (HEIF) for smaller files; use Most Compatible (JPEG) for older devices.
Does ProRAW really make a difference?
Yes, ProRAW captures more data for extensive editing but creates larger files.
How do I stop my iPhone photos from looking blurry?
Clean lens, tap to focus, avoid digital zoom, and use steady hands or volume button.
What is the best resolution setting for iPhone photos?
Use the highest resolution available (12MP or 48MP) for maximum detail.
Should I keep Live Photos on or off?
OFF for static images; ON for motion capture or social media video clips.
How do I take better landscape photos on iPhone?
Use wide lens, enable Smart HDR, level horizons with grid, and shoot during golden hour.
What lighting effect is best for portraits?
Studio Light for natural results; Contour Light for dramatic, artistic portraits.
Can I shoot professional photos with iPhone camera settings?
Yes, with ProRAW, manual controls, and proper lighting, iPhones produce professional-quality images.
How do I prevent blown-out highlights in bright scenes?
Enable Smart HDR, tap bright areas to expose for highlights, and use AE/AF Lock.
What’s the difference between HDR and Smart HDR?
Smart HDR is more advanced with automatic scene analysis and better real-time processing.
Should I edit photos on iPhone or computer?
Both work—iPhone for convenience, computer for advanced editing with professional software.
Final Thoughts: Master the Best iPhone Camera Settings Today
Understanding and implementing the best iPhone camera settings transforms your photography from casual snapshots to intentional, beautiful images that capture life’s moments with clarity, emotion, and artistic vision. Your iPhone is an incredibly powerful camera that most users barely scratch the surface of—but now you have the knowledge to unlock its full potential.
The journey from automatic settings to mastered photography doesn’t happen overnight, but every adjustment you make brings immediate improvements. Start with the fundamentals: enable that grid, turn on Smart HDR, and begin composing with the rule of thirds. As these basics become second nature, explore Portrait mode depth control, experiment with Night Mode in challenging lighting, and gradually incorporate advanced techniques like AE/AF Lock and manual exposure adjustment.
Remember that the best iPhone camera setting isn’t a one-size-fits-all formula—it’s about understanding your tools and adapting them to each unique moment. The sunset landscape requires different settings than a candlelit dinner portrait. Social media content demands different considerations than photos you’ll print and frame. The true mastery comes from knowing which best iPhone camera setting combination serves your specific creative goal in each situation.
Photography is ultimately about preserving memories, telling stories, and expressing your unique perspective on the world around you. Technical settings matter immensely—they’re the difference between a photo that captures what you saw and one that captures what you felt. But technique serves creativity, not the other way around. Use these best iPhone camera settings as tools to bring your vision to life, to freeze moments that matter, and to create images that resonate with emotion and meaning.
Try these best iPhone camera settings today. Take the same photo with default settings, then again with optimized settings following this guide. The difference will astonish you and motivate you to keep exploring, experimenting, and growing as a photographer. Your iPhone is ready—now you are too. Go capture something beautiful.